WORKING WITH GIMP SOFTWARE
Posted: Sun Sep 23, 2012 2:47 pm
GIMP TUTORIAL, BASIC CROPPING METHOD & SAVING THE FILE
Well I suppose we have to start somewhere so hopefully she will not mind, but I have chosen one of LLL’s pictures as an example of what we can try to do to improve it. These are only my own opinions and they are not a criticism or intended to be too technical in the photographic sense, rather just something we can alter using the program. Some of you will already know how to do this particular operation, but it may not be a bad idea to just go along with everyone else and start getting the hang of using this program. The general idea will be to use some of the tools and see how they work, hopefully this will build up into a general working knowledge as we go along. I will open up another thread for general questions so as not to clutter this one and as they arise we can post the explanations in this thread and it will become a reference that we can fall back on when using the program on our own pictures. So rather than have a fixed series of tutorials we will just leave it to people who have a question to ask it on the discussion thread, don’t feel intimidated by others maybe knowing more than you do, if you can’t get your head around something just ask and someone will be able to explain (I hope)
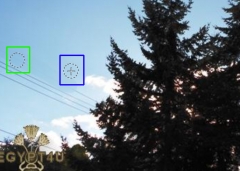
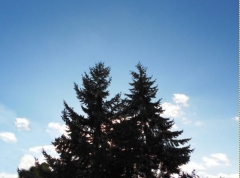
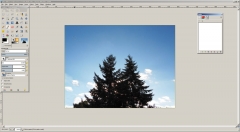
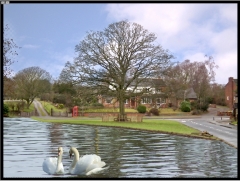
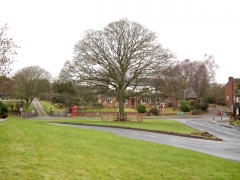
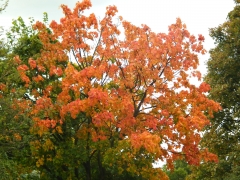
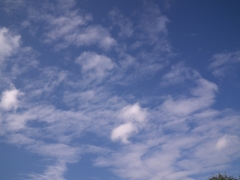
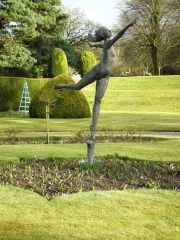
So I thought that we could start by looking at the picture and deciding what needs to be done to improve it. First off the sky is good, but the trees are quite dark, there are some phone wires on the left that spoil the picture and that little bit of building on the right is not really interesting enough to be included. I will not even mention that bloody great big Scarab that ruins most pictures, Keefy I understand the reasoning behind you having it, but as it can be so easily removed using an editing program, can it not be a little bit more discreet?
First off if everyone else can down load the picture by right clicking their mouse on it and selecting the ‘Save As’ option. (I prefer to save this type of copy straight to my Desktop as its easier to find again)
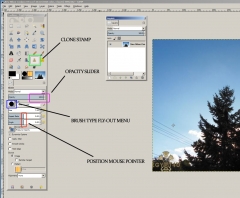
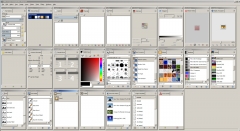
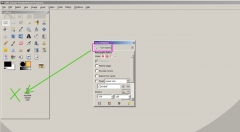
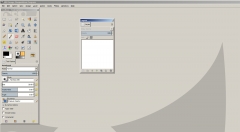
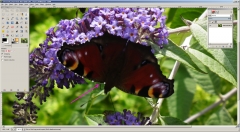
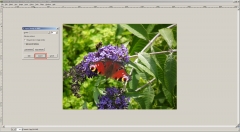
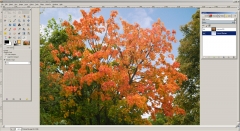
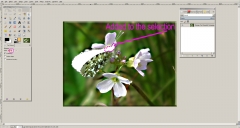
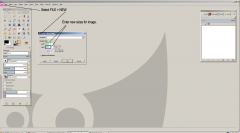
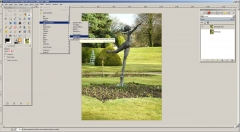
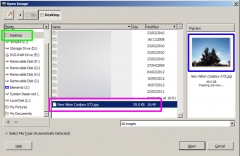
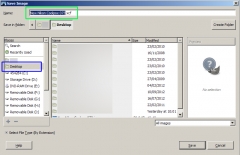
Open up your GIMP program and select FILE from the top main menu, then from the drop down menu choose OPEN. A dialogue box will open and you will need to navigate to where your picture is stored, in this screen shot you will see that all of my drives are displayed (quite a few) and if I highlight my DESKTOP (green box) you can see the COOLPIX 073.jpg highlighted (magenta box) and a thumbnail of the chosen picture (blue box) You need only to click OPEN to select the file.
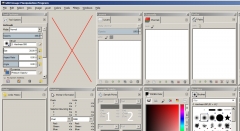
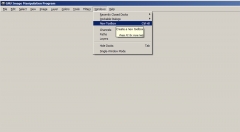
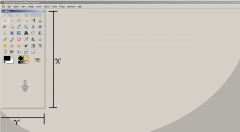
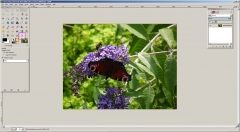
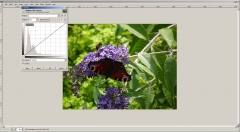
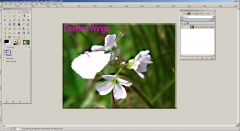
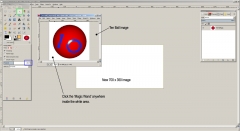
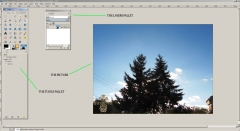
Now that the picture is loaded you can see it within its own boundary box, the actual size can be altered by going to VIEW in the main menu and selection the ZOOM option. There are lots of options to choose from, but +150% to 200% is usually sufficient for working with. Note that using the FULL SCREEN option will lose your minimise, re-size and close buttons at the top right of your screen, to get them back again you need to again select VIEW and uncheck the tick by clicking on FULL SCREEN again and it will revert back.
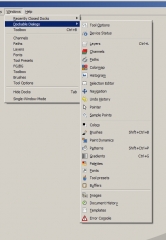
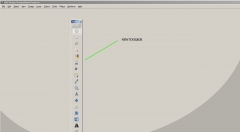
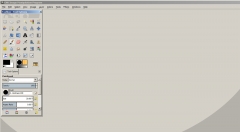
The other two PALLETS are the TOOLS PALLET and the LAYERS PALLET. If the LAYERS PALLET is not visible you can make it so bu holding down your ‘Ctrl’ key and pressing ‘L’ on your keyboard. Both PALLETS can be moved around to suit your needs by clicking in the bar at the top and holding your left mouse button down while dragging it to another location, this is very useful when you have lots of things open on your screen.
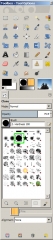
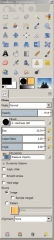
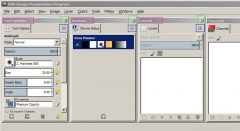
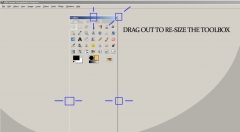
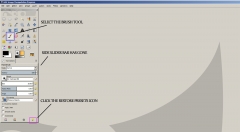
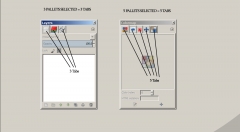
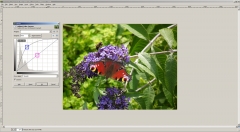
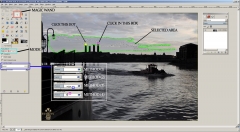
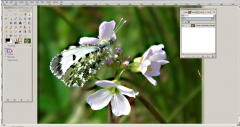
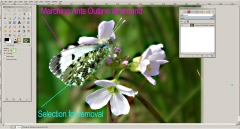
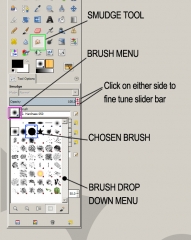
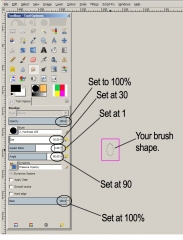
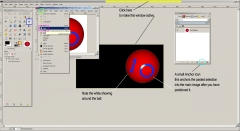
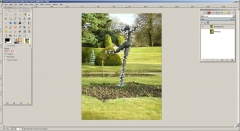
Lets make a start by cropping the picture to take out some of the dark area at the bottom of the picture and also the stray bit of building on the right. In the TOOLS PALLET select the item that looks a bit like a craft knife, (green box) this is the crop tool. When you click on this another menu will drop down to display the settings that you may change, this happens with all the tools and may contain completely different settings for each one depending upon the tool you are using. There are lots of options, but for now just look at the ASPECT RATIO (blue box) this is a way of setting up a different crop size. In this case we do not want it to change the relative size of our picture so we will make sure that the FIXED ASPECT RATIO has a tick in the box alongside, this ensures that any rectangle we pull by clicking down on the picture and while holding the left button down we drag it out to a suitable size box, this new size is always at the same scale as the original picture (see magenta box) and the section that will be cropped is darkened. If you select an area and it is not what you want, just drag out another box and the old one will disappear.
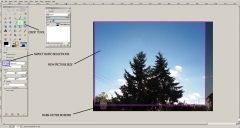
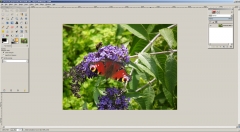
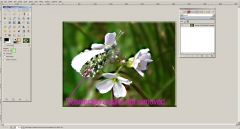
When you are happy with the new size just hit your keyboard ENTER key and it will be cropped to the new size.
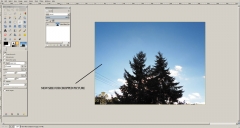
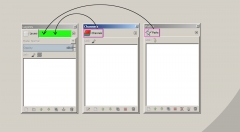
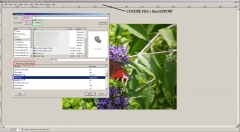
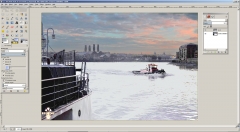
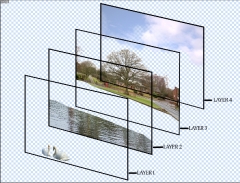
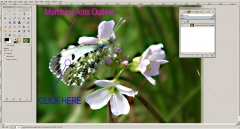
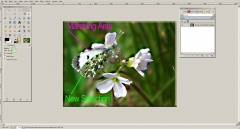
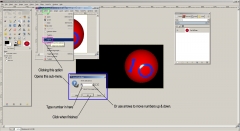
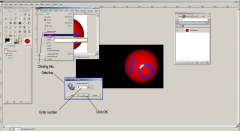
Now all we need to do is to save this to somewhere that we can find it again, so we need to go to FILE and choose the SAVE AS option. Notice that we can choose where to save our file to, as previously I am saving mine to my DESKTOP (green box) for easy location. Now this is important! Notice how the default file is the same name as your original …………………… BUT it has the file extension .xcf (blue box) after the file name and NOT .jpg. The reason for this is that we are saving a GIMP work in progress picture that may contain many layers all of which can be modified at any time that we decide to re-open the picture. If we saved it as a .jpg it would just become another basic picture with no way to change anything back again. So click the save button and notice how the name in the blue banner at the very top of your screen has changed to read .xcf after the name and not .jpg as it was when you first opened the picture.
Try all this for yourselves and try saving the file and then closing the GIMP program. Open it up again, but this time select the same file but with the .xcf extension and it should open up your cropped picture and not your original. So once you have done this it will be easy to crop any future pictures and save them.
Well I suppose we have to start somewhere so hopefully she will not mind, but I have chosen one of LLL’s pictures as an example of what we can try to do to improve it. These are only my own opinions and they are not a criticism or intended to be too technical in the photographic sense, rather just something we can alter using the program. Some of you will already know how to do this particular operation, but it may not be a bad idea to just go along with everyone else and start getting the hang of using this program. The general idea will be to use some of the tools and see how they work, hopefully this will build up into a general working knowledge as we go along. I will open up another thread for general questions so as not to clutter this one and as they arise we can post the explanations in this thread and it will become a reference that we can fall back on when using the program on our own pictures. So rather than have a fixed series of tutorials we will just leave it to people who have a question to ask it on the discussion thread, don’t feel intimidated by others maybe knowing more than you do, if you can’t get your head around something just ask and someone will be able to explain (I hope)
So I thought that we could start by looking at the picture and deciding what needs to be done to improve it. First off the sky is good, but the trees are quite dark, there are some phone wires on the left that spoil the picture and that little bit of building on the right is not really interesting enough to be included. I will not even mention that bloody great big Scarab that ruins most pictures,
First off if everyone else can down load the picture by right clicking their mouse on it and selecting the ‘Save As’ option. (I prefer to save this type of copy straight to my Desktop as its easier to find again)
Open up your GIMP program and select FILE from the top main menu, then from the drop down menu choose OPEN. A dialogue box will open and you will need to navigate to where your picture is stored, in this screen shot you will see that all of my drives are displayed (quite a few) and if I highlight my DESKTOP (green box) you can see the COOLPIX 073.jpg highlighted (magenta box) and a thumbnail of the chosen picture (blue box) You need only to click OPEN to select the file.
Now that the picture is loaded you can see it within its own boundary box, the actual size can be altered by going to VIEW in the main menu and selection the ZOOM option. There are lots of options to choose from, but +150% to 200% is usually sufficient for working with. Note that using the FULL SCREEN option will lose your minimise, re-size and close buttons at the top right of your screen, to get them back again you need to again select VIEW and uncheck the tick by clicking on FULL SCREEN again and it will revert back.
The other two PALLETS are the TOOLS PALLET and the LAYERS PALLET. If the LAYERS PALLET is not visible you can make it so bu holding down your ‘Ctrl’ key and pressing ‘L’ on your keyboard. Both PALLETS can be moved around to suit your needs by clicking in the bar at the top and holding your left mouse button down while dragging it to another location, this is very useful when you have lots of things open on your screen.
Lets make a start by cropping the picture to take out some of the dark area at the bottom of the picture and also the stray bit of building on the right. In the TOOLS PALLET select the item that looks a bit like a craft knife, (green box) this is the crop tool. When you click on this another menu will drop down to display the settings that you may change, this happens with all the tools and may contain completely different settings for each one depending upon the tool you are using. There are lots of options, but for now just look at the ASPECT RATIO (blue box) this is a way of setting up a different crop size. In this case we do not want it to change the relative size of our picture so we will make sure that the FIXED ASPECT RATIO has a tick in the box alongside, this ensures that any rectangle we pull by clicking down on the picture and while holding the left button down we drag it out to a suitable size box, this new size is always at the same scale as the original picture (see magenta box) and the section that will be cropped is darkened. If you select an area and it is not what you want, just drag out another box and the old one will disappear.
When you are happy with the new size just hit your keyboard ENTER key and it will be cropped to the new size.
Now all we need to do is to save this to somewhere that we can find it again, so we need to go to FILE and choose the SAVE AS option. Notice that we can choose where to save our file to, as previously I am saving mine to my DESKTOP (green box) for easy location. Now this is important! Notice how the default file is the same name as your original …………………… BUT it has the file extension .xcf (blue box) after the file name and NOT .jpg. The reason for this is that we are saving a GIMP work in progress picture that may contain many layers all of which can be modified at any time that we decide to re-open the picture. If we saved it as a .jpg it would just become another basic picture with no way to change anything back again. So click the save button and notice how the name in the blue banner at the very top of your screen has changed to read .xcf after the name and not .jpg as it was when you first opened the picture.
Try all this for yourselves and try saving the file and then closing the GIMP program. Open it up again, but this time select the same file but with the .xcf extension and it should open up your cropped picture and not your original. So once you have done this it will be easy to crop any future pictures and save them.